Jam.py documentation
Form examples
Currently, the Framework uses Bootstrap 2 with a simple and easy to use grid system that uses 12 columns and allows you to create any kind of layouts. It is responsive and have many components, such as dropdowns, dropdown buttons, button groups, navs, navbars, tabs, breadcrumbs, badges, progress bars, etc.
Default edit form template
This template is used for creating edit forms, if an item and its owner don’t have their own edit form template
<div class="default-edit default-details-edit">
<div class="form-body">
<div class="edit-body">
</div>
</div>
<div class="form-footer">
<button type="button" id="ok-btn" class="btn btn-ary expanded-btn">
<i class="icon-ok"></i> OK<small class="muted"> [Ctrl+Enter]</small>
</button>
<button type="button" id="cancel-btn" class="btn expanded-btn">
<i class="icon-remove"></i> Cancel
</button>
</div>
</div>
The event below is located in the task client module and is triggered for any item whose edit form has just been created.
It uses the
create_inputs
method to create inputs in the div with class “edit-body”. But before that it
checks if init_inputs function is defined in the item’s client module, that
can be used to specify the options parameter of the method.
It uses the create_inputs method to create input controls in the div with the “edit-body” class. But before that, it checks whether the init_inputs function is defined in the client module of the element, which can be used to specify the method options.
It then assigns the jQuery events to the OK and Cancel buttons.
function on_edit_form_created(item) {
    var options = {
            col_count: 1
        };

    if (item.init_inputs) {
        item.init_inputs(item, options);
    }

    item.create_inputs(item.edit_form.find(".edit-body"), options);

    item.edit_form.find("#cancel-btn").on('click.task', function(e) {
        item.cancel_edit(e)
    });
    item.edit_form.find("#ok-btn").on('click.task', function() {
        item.apply_record()
    });
}
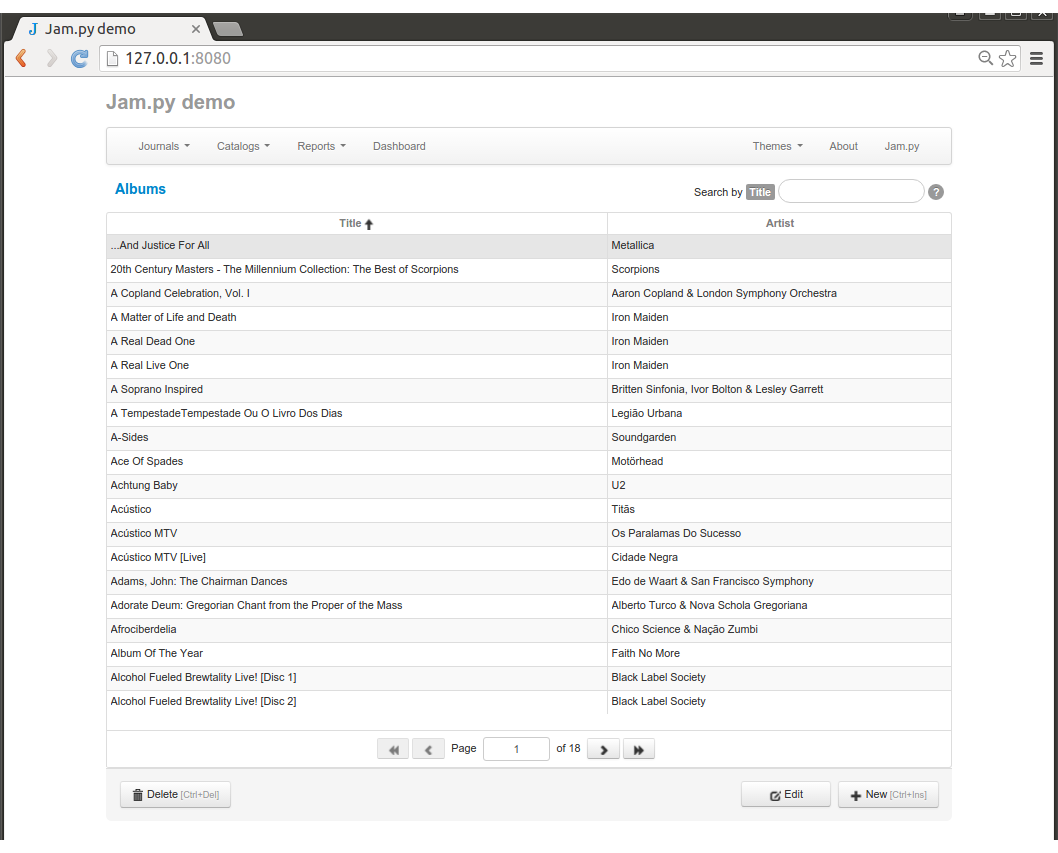
The edit form for Albums catalog looks as follows:

Note
If there are no buttons with the corresponding ids, the code above does not generate exceptions.
If you want to overwrite JQuery events for buttons declared in the client
module of the task, in the corresponding event of the client module of the
item, you can do this using the jQuery off method:
item.edit_form.find("#ok-btn")
    .off('click.task')
    .on('click', function() { some_other_function(item) });
If there is no corresponding container in the form, the create_inputs
method does nothing.
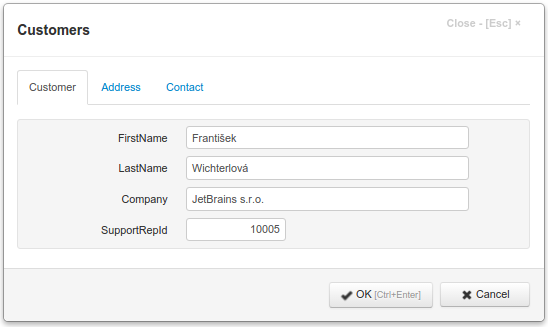
Edit form template with tabs
This example uses the Boostrap tabs:
<div class="customers-edit">
<div class="form-body">
<ul class="nav nav-tabs" id="customer-tabs">
<li class="active"><a href="#cust-name">Customer</a></li>
<li><a href="#cust-address">Address</a></li>
<li><a href="#cust-contact">Contact</a></li>
</ul>
<div class="tab-content">
<div class="tab-pane active" id="cust-name">
</div>
<div class="tab-pane" id="cust-address">
</div>
<div class="tab-pane" id="cust-contact">
</div>
</div>
</div>
<div class="form-footer">
<button type="button" id="ok-btn" class="btn btn-ary expanded-btn">
<i class="icon-ok"></i> OK<small class="muted"> [Ctrl+Enter]</small>
</button>
<button type="button" id="cancel-btn" class="btn expanded-btn">
<i class="icon-remove"></i> Cancel
</button>
</div>
</div>
The following event handler is declared in the Customers item client module. It creates input controls for panes, corresponding to tabs:
function on_edit_form_created(item) {
    item.edit_form.find('#customer-tabs a').click(function (e) {
      e.preventDefault();
      $(this).tab('show');
    });
    item.create_inputs(item.edit_form.find("#cust-name"),
        {fields: ['firstname', 'lastname', 'company', 'support_rep_id']}
    );
    item.create_inputs(item.edit_form.find("#cust-address"),
        {fields: ['country', 'state', 'address', 'postalcode']}
    );
    item.create_inputs(item.edit_form.find("#cust-contact"),
        {fields: ['phone', 'fax', 'email']}
    );
}
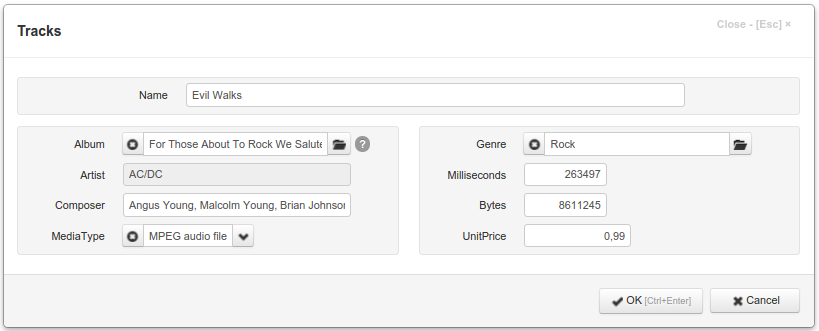
Edit form template using grid layout
This example uses the Boostrap grid system:
<div class="tracks-edit">
<div class="form-body">
<div class="row-fluid">
<div id="edit-top" class="span12 edit-border"></div>
</div>
<div class="row-fluid">
<div id="edit-left" class="span6 edit-border"></div>
<div id="edit-right" class="span6 edit-border"></div>
</div>
</div>
<div class="form-footer">
<button type="button" id="ok-btn" class="btn btn-ary expanded-btn">
<i class="icon-ok"></i> OK<small class="muted"> [Ctrl+Enter]</small>
</button>
<button type="button" id="cancel-btn" class="btn expanded-btn">
<i class="icon-remove"></i> Cancel
</button>
</div>
</div>
function on_edit_form_created(item) {
    item.edit_options.width = 900;
    item.create_inputs(item.edit_form.find("#edit-top"), {fields: ['name']});
    item.create_inputs(item.edit_form.find("#edit-left"), {
        fields: ['album', 'artist', 'composer', 'media_type'],
        label_width: 90
    });
    item.create_inputs(item.edit_form.find("#edit-right"), {
        fields: ['genre', 'milliseconds', 'bytes', 'unitprice'],
        label_width: 90
    });
}
Catalogs view form template
In this example there is a div with class “form-header”.
The element with id “form-title” is used in the on_view_form_created method of the task to display the caption of an item and assign to it a JQuery onclick event to execute view method to recreate the view form.
The elements with id “selected-div” and “search-form” are used in the on_view_form_created of the catalogs group to display current value of a lookup field when the right button is clicked to select a value and to implement search functionality of catalogs correspondingly
The div with class “view-table” is used in the on_view_form_created event handler of the task to create a table to display item’s data by using create_table method:
if (item.view_form.find(".view-table").length) {
    if (item.init_table) {
        item.init_table(item, table_options);
    }
    item.create_table(item.view_form.find(".view-table"), table_options);
    item.open(true);
}
The div with id “report-btn” is used in the on_view_form_created event handler of the task to fill dropdown button menu items with reports defined in the Reports Dialog of the item (if they exist).
<div class="catalogs-view">
<div class="form-body">
<div class="form-header">
<h4 id="form-title" class="header-text"><a href="#"></a></h4>
<h5 id="selected-div" class="header-text" style="display: none">
<a id="selected-value" href="#"></a>
</h5>
<form id="search-form" class="form-inline pull-right">
<label class="control-label" for="search-input">Search by
<span class="label" id="search-fieldname"></span>
</label>
<input id="search-input" type="text" class="input-medium search-query" autocomplete="off">
<a id="search-field-info" href="#" tabindex="-1">
<span class="badge">?</span>
</a>
</form>
</div>
<div class="view-table">
</div>
</div>
<div class="form-footer">
<button id="delete-btn" class="btn expanded-btn pull-left" type="button">
<i class="icon-trash"></i> Delete<small class="muted"> [Ctrl+Del]</small>
</button>
<div id="report-btn" class="btn-group dropup">
<a class="btn expanded-btn dropdown-toggle" data-toggle="dropdown" href="#">
<i class="icon-print"></i> Reports
<span class="caret"></span>
</a>
<ul class="dropdown-menu bottom-up">
</ul>
</div>
<button id="edit-btn" class="btn expanded-btn" type="button">
<i class="icon-edit"></i> Edit
</button>
<button id="new-btn" class="btn expanded-btn" type="button">
<i class="icon-plus"></i> New<small class="muted"> [Ctrl+Ins]</small>
</button>
</div>
</div>
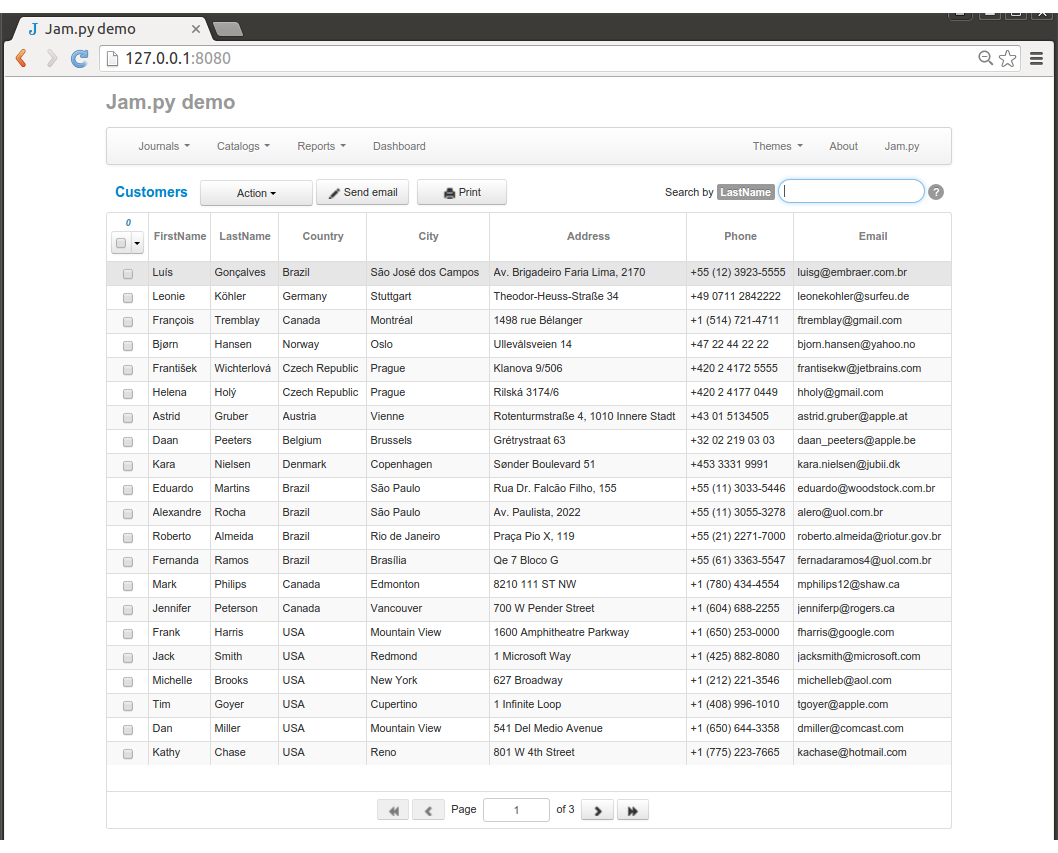
View form template with buttons at the top
In this example the form footer div is removed and buttons are placed to the form header div. The Actions dropdown button is created. The code is the same as in previous example.
<div class="customers-view">
<div class="form-body">
<div class="form-header">
<h4 id="form-title" class="header-text"><a href="#"></a></h4>
<h5 id="selected-div" class="header-text" style="display: none">
<a id="selected-value" href="#"></a>
</h5>
<div class="btn-group">
<a class="btn expanded-btn dropdown-toggle" data-toggle="dropdown" href="#">
Action
<span class="caret"></span>
</a>
<ul class="dropdown-menu">
<li><a id="new-btn" href="#">
<i class="icon-plus"></i> New<small class="muted"> [Ctrl+Ins]</small>
</a></li>
<li><a id="edit-btn" href="#">
<i class="icon-edit"></i> Edit
</a></li>
<li class="divider"></li>
<li><a id="delete-btn" href="#">
<i class="icon-trash"></i> Delete<small class="muted"> [Ctrl+Del]</small>
</a></li>
</ul>
</div>
<div id="report-btn" class="btn-group dropup">
<a class="btn expanded-btn dropdown-toggle" data-toggle="dropdown" href="#">
<i class="icon-print"></i> Reports
<span class="caret"></span>
</a>
<ul class="dropdown-menu bottom-up">
</ul>
</div>
<button style="display: none" id="email-btn" class="btn expanded-btn" type="button">
<i class="icon-pencil"></i> Send email
</button>
<button style="display: none" id="print-btn" class="btn expanded-btn" type="button">
<i class="icon-print"></i> Print
</button>
<form id="search-form" class="form-inline pull-right">
<label class="control-label" for="search-input">Search by
<span class="label" id="search-fieldname"></span>
</label>
<input id="search-input" type="text" class="input-medium search-query" autocomplete="off">
<a id="search-field-info" href="#" tabindex="-1">
<span class="badge">?</span>
</a>
</form>
</div>
<div class="view-table">
</div>
</div>
</div>
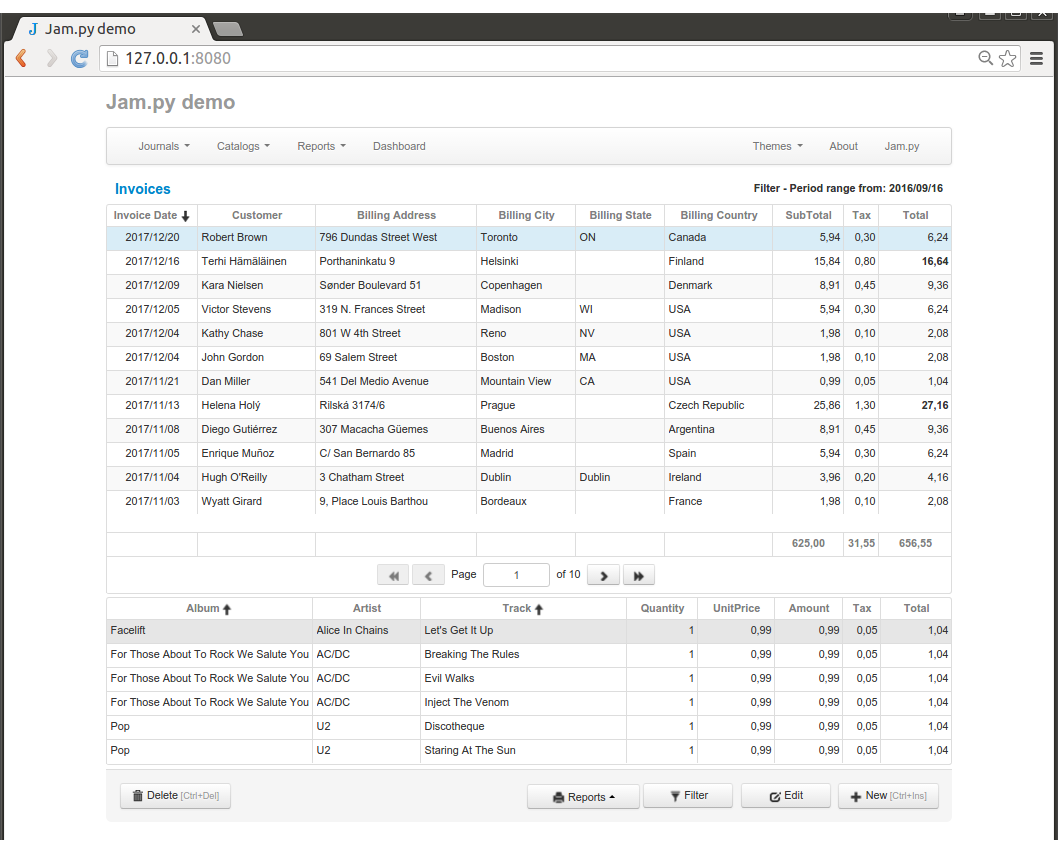
View form template with detail
In this example the div with class “view-table” is removed and added two divs “view-master” and “view-detail” tables for master and detail items are created in the on_view_form_created event handler declared in the client module of Invoices journal:
function on_view_form_created(item) {
    var height = $(window).height() - $('body').height() - 200 - 10;

    if (height < 200) {
        height = 200;
    }

    item.filters.invoicedate1.value = new Date(new Date().setYear(new Date().getFullYear() - 1));

    item.create_table(item.view_form.find(".view-master"), {
        height: height,
        sortable: true,
        show_footer: true,
        row_callback: function(row, it) {
            var font_weight = 'normal';
            if (it.total.value > 10) {
                font_weight = 'bold';
            }
            row.find('td.total').css('font-weight', font_weight);
        }
    });

    item.invoice_table.create_table(item.view_form.find(".view-detail"), {
            height: 200 - 4,
            dblclick_edit: false,
            column_width: {'track': '25%', 'album': '25%', 'artists': '10%'}
    });

    item.open(true);
}
<div class="invoices-view">
<div class="form-body">
<div class="form-header">
<h4 id="form-title" class="header-text"><a href="#"></a></h4>
<h5 id="filter-text" class="header-text pull-right"></h5>
</div>
<div class="view-master">
</div>
<div class="view-detail" style="margin-top: 4px; margin-bottom: 4px">
</div>
</div>
<div class="form-footer">
<button id="delete-btn" class="btn expanded-btn pull-left" type="button">
<i class="icon-trash"></i> Delete<small class="muted"> [Ctrl+Del]</small>
</button>
<div id="report-btn" class="btn-group dropup">
<a class="btn expanded-btn dropdown-toggle" data-toggle="dropdown" href="#">
<i class="icon-print"></i> Reports
<span class="caret"></span>
</a>
<ul class="dropdown-menu bottom-up">
</ul>
</div>
<button id="filter-btn" class="btn expanded-btn" type="button">
<i class="icon-filter"></i> Filter
</button>
<button id="edit-btn" class="btn expanded-btn" type="button">
<i class="icon-edit"></i> Edit
</button>
<button id="new-btn" class="btn expanded-btn" type="button">
<i class="icon-plus"></i> New<small class="muted"> [Ctrl+Ins]</small>
</button>
</div>
</div>